Just back from some exhaustive post fettle checks - well, I had to ride a few miles to make sure that all was ok :)
I have moved my handle bars above the tripe yoke
For some time now I have had pain in my back - nothing to do with the bike, just a long time nursing knackers backs!
quite straight forward really, but thought I would post up with a few pointes
My falco has braided steel hoses on both clutch and brake btw
I used a rear paddock stand and a front yoke stand and got the bike up in the air - I also made sue I had a suitable fulcrum point near the front wheel and a long piece of wood to use as a lever
You need a 14mm allen key or socket to undo the central lock nut, then unclamp the top triple yoke and the bars them selves - do not forget to undo the locking bolts! - pop them safely to one side, though we will not need them again for this job
Once they are off, you need to slacken the lower triple clamp and using a friend as weight on the end of the lever move the fork legs up to show 6 rings - you may find it easier to pop the top triple clamp on to ensure you get it right - then tighten up the bottom clamp, and ensure it is tight
My bars with some wiggling came off with all the switches etc still attached - you may need to undo stuff, and possibly reroute things - I did not need to - but just double check...
Now, the fancy part - ensuring that your bars are pinned in place....
take your top triple clamp off and drill a pilot hole through the threaded hole that the lock pin bolts into. Turn the clamp over and drill through the pilot hole - CAREFULLY - you want to just go into the threaded hole - I used a size six drill. Once that is done, I used a correct size tap and continued the thread through the hole so I had a good thread through out.
Reassemble the bars and using a longer bolt - I had a couple lying around with allen key heads tighten down to the thread - but no further, just so there is some resistance and you are certain it is central. I then used a stayloc nut and washer and tightened from the bottom to just to ensure there is no possibility of slackness.
Now you are left with one problem - the brake master cylinder is too proud and hits the fairing. Remove the metal bracket that it is mounted on and then bolt straight into the mounting hole - it is at a slight angle, but clears the fairing easily, and you still have your master cylinder above the brake :)
After a hundred or so miles of extensive road testing, all is good - no back ache
The bikes steering is now a fair bit faster - I will be dropping an ohlins steering damper in over the next week to help with that
Worthwhile doing - I think so
Please just ask if you want any photos posting
Thanks to assorted people who I have asked advice from or who have otherwise assisted me :)
this week ends fettle - Bars moved
Moderators: Aladinsaneuk, MartDude, D-Rider, Moderators
-
Aladinsaneuk

- Aprilia Admin
- Posts: 9503
- Joined: Wed Jan 03, 2007 10:37 pm
- Location: Webfoot territory
this week ends fettle - Bars moved
Let's face it, you wouldn't go to a nurse to get good advice on a problem with a Falco - you'd choose an Engineer or a mechanic...
-
Falcopops

- GP Racer

- Posts: 2530
- Joined: Mon Dec 18, 2006 4:00 pm
- Location: Back to sweating in the tropics
- Main bike: Still loving the Falco
Good tips.
Did you do the bolt hole as a positioning aid or to ensure they stay put.
If I ever get round to doing this I was just going to go with the friction grip of the bar clamps, but with the Ohlins forks I'll have a shim between the clamp and the fork leg that might be more conducive to them slipping.
How did you get the pilot hole central?
I'm thinking that instead of tapping the new hole, just oversizing it (new length only) and bolting to the existing threads, what d'ya think?

Yeah, yeah, did all that last year. Can't you stop copying me and come up with something original? 
SHINY BIKE SYNDROME Motorcycle valeting and paint protection specialist.
Aladinsaneuk wrote:andy is having a VERY heavy period

-
Aladinsaneuk
- Aprilia Admin
- Posts: 9503
- Joined: Wed Jan 03, 2007 10:37 pm
- Location: Webfoot territory
if you look, in the threaded hole, you will see it is tapped and marked already = mine was at any rate :)
no need for a hammer for this mod - but i did use one earlier on in the day to wedge the beer cooler door open ....
as for angle grinders.... it is not a rice burner
photos will follow as I am stripping down the fairings to tidy up some wiring etc.....
no need for a hammer for this mod - but i did use one earlier on in the day to wedge the beer cooler door open ....
as for angle grinders.... it is not a rice burner
photos will follow as I am stripping down the fairings to tidy up some wiring etc.....
Let's face it, you wouldn't go to a nurse to get good advice on a problem with a Falco - you'd choose an Engineer or a mechanic...
-
Aladinsaneuk
- Aprilia Admin
- Posts: 9503
- Joined: Wed Jan 03, 2007 10:37 pm
- Location: Webfoot territory
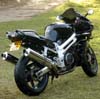
ok, some photos:
on this you can see the long bolt through the yoke and bar -

next - the riders view - you can see the top of the locating bolts.
Also, the mount below the screen is for my garmin Zumo - makes it very easy to see while on a long journey! Finally note the brake master cylinder - this clears the fairing

This shows the right hand bar and lock pin quite clearly. The ball mount was made by myself and allows a ram mount to be attached if needed by anything - the ball also doubles up to secure the aprilia tank bag :)

Next, the steering is now fairly swift - so I have fitted an ohlins steering damper from an RSV r to help with that - works nicely on 7 clicks :)
(You can also see where I have put the ballast for my HID )

Finally, The foreman of the works checking over the finished bike and giving his seal of approval!

on this you can see the long bolt through the yoke and bar -
next - the riders view - you can see the top of the locating bolts.
Also, the mount below the screen is for my garmin Zumo - makes it very easy to see while on a long journey! Finally note the brake master cylinder - this clears the fairing
This shows the right hand bar and lock pin quite clearly. The ball mount was made by myself and allows a ram mount to be attached if needed by anything - the ball also doubles up to secure the aprilia tank bag :)
Next, the steering is now fairly swift - so I have fitted an ohlins steering damper from an RSV r to help with that - works nicely on 7 clicks :)
(You can also see where I have put the ballast for my HID )
Finally, The foreman of the works checking over the finished bike and giving his seal of approval!
Let's face it, you wouldn't go to a nurse to get good advice on a problem with a Falco - you'd choose an Engineer or a mechanic...
-
Aladinsaneuk
- Aprilia Admin
- Posts: 9503
- Joined: Wed Jan 03, 2007 10:37 pm
- Location: Webfoot territory
update
I fitted an ohlins steering damper off an 2005 rsvr this morning and then went for a good blast
initially i set the damper to 5 clicks - after 40 odd miles i upped it to six and did a 100 miles fast blast through some twisties
the riding position is vastly improved for me - the stance took a little adjustment, but now it is very comfortable, and my the steering is quick - but with the dasmper it is quick in a positive way - the front end does not feel at all light no matter what i do
I will move it to 7 clicks tomorrow which i think will be perfect for me
for the record, I am 5'10" and am about 13stone with leathers on... well, may be 13 and 1/2!
bike has conto road attacks on, front wheel pressure 36, rear 42
bikes are galfer wavy disks with braided hoses - dual hoses for the front btw
Let's face it, you wouldn't go to a nurse to get good advice on a problem with a Falco - you'd choose an Engineer or a mechanic...