I started at about 1130 this morning and have just taken a break for lunch
So far:
raised bike on ABBA stand and have removed the rear wheel
I have switched the rear sprocket for a 43 tooth renthal that happened to be lying around and that looked lonely
I have pulled the exhausts off - well the slip ons anyway
Back brake is hanging off the side, well supported
(One of the retaing screws for the brake pipes is being a pain - it will be pulled when the old swing arm is off)
Front sprocket cover is off - and my my scottoiler has put a lot of crap in there!
Tank is loosened off ready to be lifted to envisage the rear pot exhaust clamp
I was going to cut the chain, then i stopped and thought about it..... i am taking the swing arm off - so no need to cut it... well, that is what I think atm LOL
so, will add to this as the work progresses, and when i have a moment will add the photos of the work in progress
Main things learnt so far :
Research - am so glad others have done this job and left pointers!
ABBA stand - indispensible for this kind of work I think
Decent tools - and a willing neighbour when i needed to loosen the rear sprocket nuts... fat boys for the win :)
Space - really helps to lay bits out
more to come later
The work in progress
Moderators: Aladinsaneuk, MartDude, D-Rider, Moderators
-
Aladinsaneuk

- Aprilia Admin
- Posts: 9503
- Joined: Wed Jan 03, 2007 10:37 pm
- Location: Webfoot territory
-
falcomunky

- SuperBike Racer

- Posts: 820
- Joined: Wed Jan 03, 2007 8:29 pm
- Location: NEUK
Top work Aladinsaneuk! 
"I was going to cut the chain, then i stopped and thought about it..... i am taking the swing arm off - so no need to cut it... well, that is what I think atm LOL"
That mean youd like to reuse the chain? Might be difficult unless you intend to cut the new swinger to thread it through...
"I was going to cut the chain, then i stopped and thought about it..... i am taking the swing arm off - so no need to cut it... well, that is what I think atm LOL"
That mean youd like to reuse the chain? Might be difficult unless you intend to cut the new swinger to thread it through...
Two is the magic number... ;)

-
Aladinsaneuk
- Aprilia Admin
- Posts: 9503
- Joined: Wed Jan 03, 2007 10:37 pm
- Location: Webfoot territory
poxy bastard bloody thing
ok - to explain - the old chain will be kept, just in case this swing arm gets bent etc - I have a new mille length, 110 link chain to fit
yes, I am using the ABBA with the adapter to allow removal of swing arm
so - update time
white shock is off, mud guard is off - this was a pain to do - getting that battery out with my short fat stumpy fingers is a pita!
two of the clamp nuts for the rear pot exhaust are off, but the third - can't get onto the damn thing with a UJ or anything - so waiting for secret weapon to arrive - a friend with flexi extension - that hopefully will do it
All old parts that are to be stored are now cleaned off and all nuts/bolts removed have been gunked and greased ready for refit
when Fourstar arrives, the old swingarm will be pulled out and that hopefully will be it for the night
when I get back later i will post some of the pictures etc
-
Falco9

- Aprilia Admin
- Posts: 1154
- Joined: Wed Jan 03, 2007 9:24 pm
- Location: Wakefield. West Yorkshire
When you do get to the 3rd bolt (7/8 extention will do it) just loosen it off rather than remove it completely.
I managed to fit the swinging arm under the rear header without actually removing it, but this does depend on how high the rear of the bike is.
I had mine suspended from the garage roof trusses and with a bit of chuckle brothers (to me, to you) it slid under OK, leaving me with just a quick tighten up rather than the 1/2hr swearing technique that apparently accompanies the re-fitting of the header nuts
Maybe worth a try???
As I remember, I didn't need to remove the mudguard or the battery though
I also have an uncut chain left over from the swap, I wonder where it is??
F9
-
bigun

- AP RS Legend
- Posts: 485
- Joined: Thu Jan 04, 2007 5:13 pm
- Location: South Witham (nr Stamford Lincs) - exiled Geordie!
I loosened the nuts on the header to within the last thread i think and with some brute force pulling the header pipe the swingarm slipped straight in. I did the job in stages as the weather allowed (bike outside) and reckon it only took me 1.5hrs-2hrs start to finish. Be methodical and its easy. Good luck. 
Bigun
-
falcomunky
- SuperBike Racer
- Posts: 820
- Joined: Wed Jan 03, 2007 8:29 pm
- Location: NEUK
Re the top header nut; If ya havnt thought of this already, try raising the fuel tank to near vertical and prop it with summink appropriate.
You can then easily access the nut with a spanner!
It took me a while to figure this out as NO WHERE online could I find a specific reference as to how to get at it! As has been stated; Dont remove it completely, just loosen it off til the last thread or two.
HTH!
You can then easily access the nut with a spanner!
It took me a while to figure this out as NO WHERE online could I find a specific reference as to how to get at it! As has been stated; Dont remove it completely, just loosen it off til the last thread or two.
HTH!
Two is the magic number... ;)
-
Aladinsaneuk
- Aprilia Admin
- Posts: 9503
- Joined: Wed Jan 03, 2007 10:37 pm
- Location: Webfoot territory
ok,,,
well, i think I know why mine was such a pig - the top end of my falco appears to have bits of mille.... there was no poxy way it was going to go with the afore mentioned tricks
(when I fitted my scottoiler i hit a similar snag - the pipework turned out to be 98/99 mille setup - i had to use a T tube....)
anyway, flexible friend arrived with flexible tube and nut off. Header removed
Next, I removed the old dog legs and cleaned up and then removed the swing arm
Note i said that quickly - a lot more quickly than it took as I did not have the right size tool to undo the inner lock.. I swear I had one, but either my wife used it to clean her claws, or the cat ate it..... several hours later a jury rigged tool was used to unscrew it and then the old swing arm was removed.
so - is now BEER o'Clock and i have stopped for the night - the new swing arm is in place and all the doglegs are attached - the shock isn't as yet as i want to think on this a bit before definitly putting the old blue back in.
Tomoorow, I will put the poxy exhaust header back on, and fit the shock, then start doing the checking and tightening of everything in sight. Finally I will be fitting the new chain and going for a little blatt :)
oh, it looks nice btw - unlike my shed that looks like a bomb has hit it!
-
Aladinsaneuk
- Aprilia Admin
- Posts: 9503
- Joined: Wed Jan 03, 2007 10:37 pm
- Location: Webfoot territory
OK some images

that is the Abba stand fitted - please note that it gives a pretty good clearance to the ground LOL
and that shot also shows a fairly tidy workshop... not like that tonight!
(The screen you can see is an old imac that i use there for when i need access to info from the web - a simple wifi connection and very cheap to do - well worth it imho)

a close up on how the 'stand was fitted - in retrospect i maybe should have fitted the kit to the lower bolts to raise the height more....

ok, pipes off and starting to clear through to the swing arm

rear wheel removed - note how i made sure that the rear brake was supported :)

everything now cleared out - mudflap has gone etc - i think i need to clean there a bit LOL

and there we have it - loosely fitted, waiting on a few bits before i start tightening down
that is the Abba stand fitted - please note that it gives a pretty good clearance to the ground LOL
and that shot also shows a fairly tidy workshop... not like that tonight!
(The screen you can see is an old imac that i use there for when i need access to info from the web - a simple wifi connection and very cheap to do - well worth it imho)
a close up on how the 'stand was fitted - in retrospect i maybe should have fitted the kit to the lower bolts to raise the height more....
ok, pipes off and starting to clear through to the swing arm
rear wheel removed - note how i made sure that the rear brake was supported :)
everything now cleared out - mudflap has gone etc - i think i need to clean there a bit LOL
and there we have it - loosely fitted, waiting on a few bits before i start tightening down

Now that's a clever idea. Not only can you check information if you need it, you can surf for porn / post here / upload photos as you need to.Aladinsaneuk wrote:(The screen you can see is an old imac that i use there for when i need access to info from the web - a simple wifi connection and very cheap to do - well worth it imho)
-
Aladinsaneuk
- Aprilia Admin
- Posts: 9503
- Joined: Wed Jan 03, 2007 10:37 pm
- Location: Webfoot territory
and so dawned wednesday....
wandered off to town early on to avail myself of a rubber mallet - not for today's job, but to twat myself around the head with when i have another bright idea....
so, reassembly time
swing arm tightened and torqued
shock fitted, and torqued up
(Both will be checked again later)
rear wheel cleaned.... waste of bloody time imho - the dirt was black, and covered my black wheels.....
rear axle cleaned down, lightly greased and then rear wheen popped in loosely - waiting on chain at 1700 tonight - well chap with the tool arrives then!
brakes cleaned and attached
brake lines finally placed along bottom of swing arm with correct cover.... is damn tight but did it
rear exhaust cans reattached
battery put back in, powered up, clocks reset back to proper english, none of that johnny foreigner kilometers here!
redline set - 10250 this time
so all in all quite good
BUT
the pigging header pipe will not connect properly to the midpipe - and is sitting proud - and buggered if i can shift it
ANY THOUGHTs would be much appreciated
final lap this evening is to get the chain on, and then take some photos - I may even clean the rest of the bike.....
-
Aladinsaneuk
- Aprilia Admin
- Posts: 9503
- Joined: Wed Jan 03, 2007 10:37 pm
- Location: Webfoot territory
am not going to reveal my work round
(is not good and means i will be fettling when i have time in a few weeks)
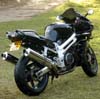
all together now - and will do final checks tomorrow before i go for a quick spin and recheck again
I think I will redo this whole thing soon though - and replace bearings etc - it feels.. NECESSARY so that i am happy :)
(is not good and means i will be fettling when i have time in a few weeks)
all together now - and will do final checks tomorrow before i go for a quick spin and recheck again
I think I will redo this whole thing soon though - and replace bearings etc - it feels.. NECESSARY so that i am happy :)
-
falcomunky
- SuperBike Racer
- Posts: 820
- Joined: Wed Jan 03, 2007 8:29 pm
- Location: NEUK